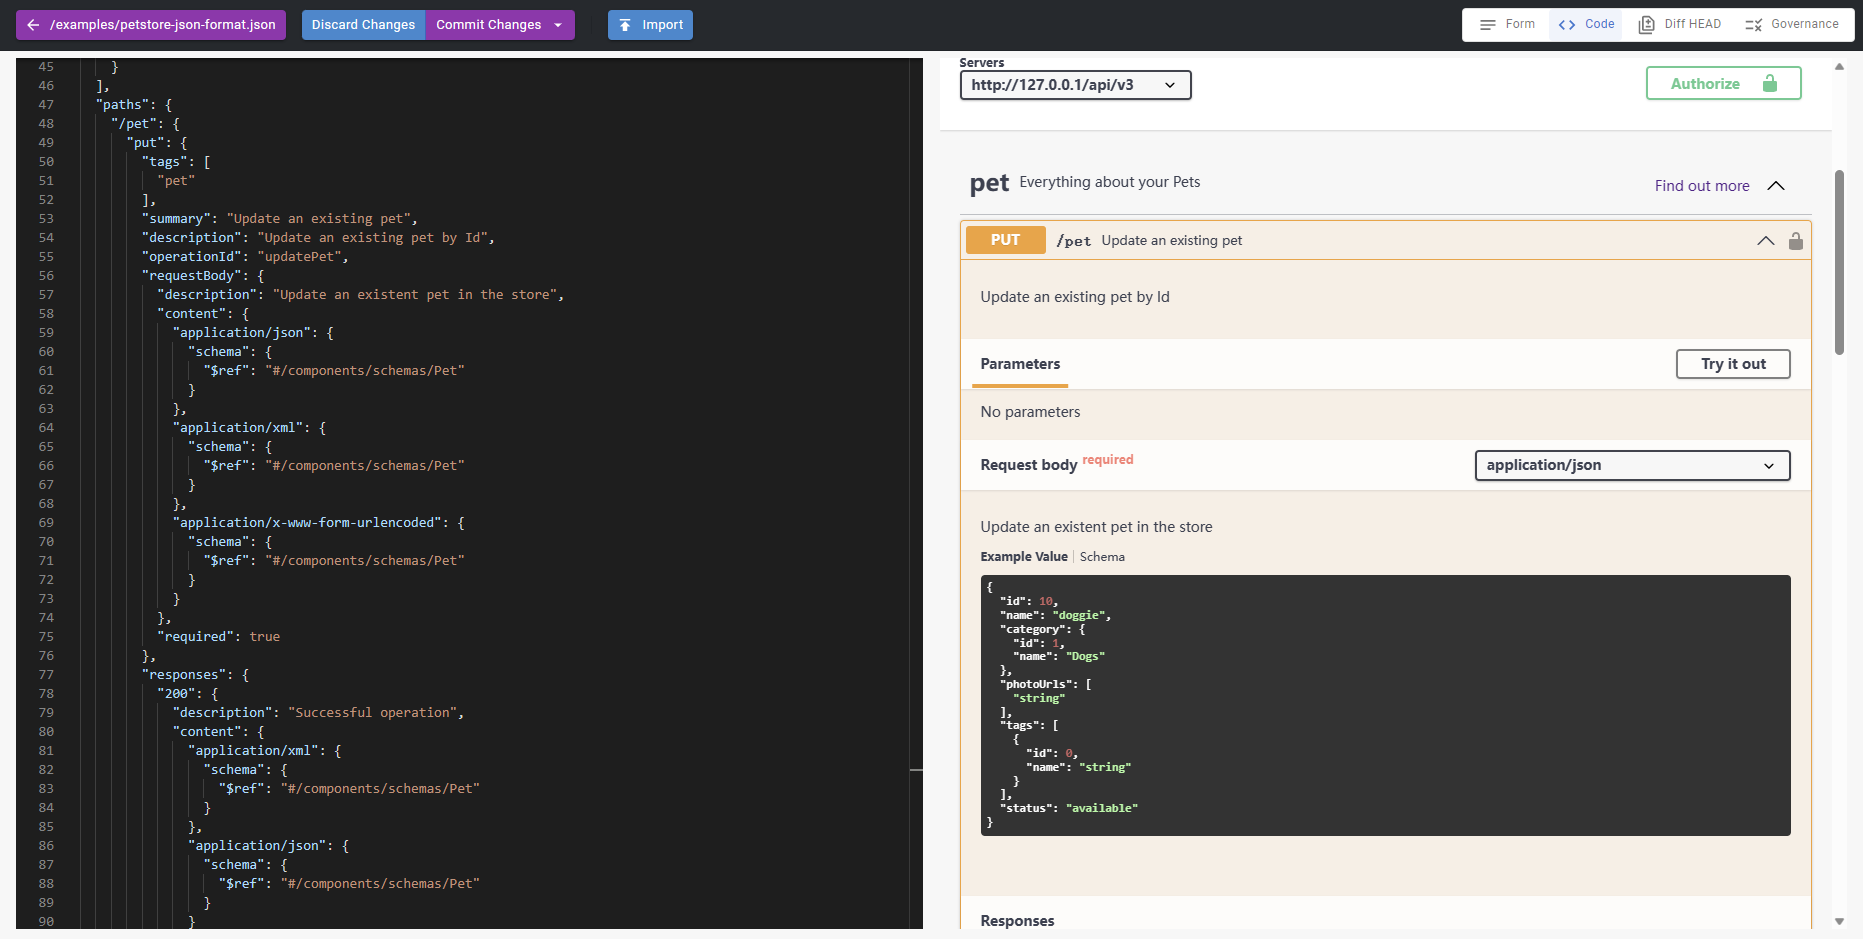
Swagger UI is an open-source tool that generates a user interface for an OpenAPI specification, allowing users to visualize and interact with the API endpoints. The tool is developed and maintained by the Swagger project, which is now a part of the larger OpenAPI Initiative.
Swagger UI can be used to quickly test and explore an API without the need for additional tools or software. Once an OpenAPI specification is provided, Swagger UI generates an interactive documentation page that includes information about the API's endpoints, parameters, responses, and more. The user interface is generated dynamically based on the information provided in the specification, which means that changes made to the API will automatically be reflected in the documentation.
In addition to providing documentation and testing capabilities, Swagger UI also supports various features such as syntax highlighting, response validation, and code generation. The tool can be used with APIs that are built using any programming language and can be customized to match the branding and style of the API.
Today we will add our first api in Swagger UI.
Field of Server
In an OpenAPI specification, the Server Object is used to define information about the server hosting the API. The Server Object includes several fields that can be used to provide information such as the server's URL, protocol, and description. Here are the fields that can be included in a Server Object:
url: This field specifies the base URL of the server. It is a required field and must be included in the Server Object.
description: This field provides a description of the server. It is an optional field and can be included to provide additional information about the server.
variables: This field is used to define variables that can be used in the url field. Variables are enclosed in curly braces () and can be used to represent parts of the URL that can be customized for different environments or use cases.
scheme: This field specifies the communication protocol used by the server (e.g., HTTP, HTTPS, etc.). It is an optional field and defaults to "http" if not specified.
headers: This field is used to specify any headers that should be included in requests to the server. It is an optional field and can be used to provide additional information or authentication credentials.
Here is an example of a Server Object with all of the fields included:
"servers": [
  {
    "url": "https://api.example.com/{version}",
    "description": "Example API Server",
    "variables": {
      "version": {
        "enum": ["v1", "v2"],
        "default": "v1"
      }
    },
    "scheme": "https",
    "headers": {
      "X-API-Key": {
        "description": "API key",
        "required": true
      }
    }
  }
]
Here is an example of a Server Object for our first api.
 Add a server.
Field of Tag
In an OpenAPI specification, the Tag Object is used to define a tag for a set of related operations. The Tag Object includes several fields that can be used to provide information such as the tag's name, description, and associated operations. Here are the fields that can be included in a Tag Object:
name: This field specifies the name of the tag. It is a required field and must be included in the Tag Object.
description: This field provides a description of the tag. It is an optional field and can be included to provide additional information about the tag.
externalDocs: This field provides a reference to additional documentation for the tag. It is an optional field and can be used to provide additional information or resources related to the tag.
x-tag-info: This field is an extension field that can be used to provide additional information about the tag. It is an optional field and can be used to provide custom information or metadata about the tag.
Here is an example of a Tag Object with all of the fields included:
"tags": [
  {
    "name": "pets",
    "description": "Operations related to pets",
    "externalDocs": {
      "description": "Find more info here",
      "url": "https://example.com/pets/info"
    },
    "x-tag-info": {
      "owner": "John Smith"
    }
  }
]
Here is an example of a Tag Object for our first api.
 Add a tag.
Field of Schema
In an OpenAPI specification, the Schema Object is used to describe the structure and data types of an object. The Schema Object includes several fields that can be used to provide information such as the schema's type, format, and properties. Here are the fields that can be included in a Schema Object:
title: This field specifies the title of the schema. It is an optional field and can be included to provide a human-readable title for the schema.
type: This field specifies the type of the schema. It is a required field and can be one of several possible values, such as "string", "number", "integer", "boolean", "array", or "object".
format: This field specifies the format of the schema. It is an optional field and can be used to further specify the data type of the schema. For example, if the type is "string", the format field can be used to indicate that the string is a date or a time.
description: This field provides a description of the schema. It is an optional field and can be included to provide additional information about the schema.
properties: This field specifies the properties of an object schema. It is an optional field and can be used to define the properties and data types of an object's properties.
items: This field specifies the schema of the items in an array. It is an optional field and can be used to define the data type of an array's items.
required: This field specifies the required properties of an object schema. It is an optional field and can be used to specify which properties of an object schema are required.
example: This field provides an example of the schema. It is an optional field and can be used to provide an example value for the schema.
Here is an example of a Schema Object with all of the fields included:
{
  "type": "object",
  "title": "Person",
  "description": "A person schema",
  "properties": {
    "name": {
      "type": "string"
    },
    "age": {
      "type": "integer"
    },
    "email": {
      "type": "string",
      "format": "email"
    }
  },
  "required": [
    "name"
  ],
  "example": {
    "name": "John Smith",
    "age": 30,
    "email": "john.smith@example.com"
  }
}
Here is an example of a Schema Object for our first api.
 Add a schema.
Field of paths
In an OpenAPI specification, the paths object is used to define the available endpoints (or routes) and operations on those endpoints. The paths object is a key-value map where the keys are the endpoint paths and the values are Path Item Objects. Here are the fields that can be included in a Path Item Object:
HTTP Method: There are several HTTP methods, such as GET, POST, PUT, DELETE, PATCH, HEAD, OPTIONS, and TRACE. This field specifies the HTTP method that the endpoint supports.
summary: This field provides a brief summary of the endpoint operation.
description: This field provides a detailed description of the endpoint operation.
parameters: This field specifies the parameters that are accepted by the endpoint operation. It can be an array of Parameter Objects or a reference to a parameter definition.
requestBody: This field specifies the request body that is expected by the endpoint operation. It is an optional field and can be an RequestBody Object or a reference to a request body definition.
responses: This field specifies the possible responses that can be returned by the endpoint operation. It is a key-value map where the keys are the HTTP status codes and the values are Response Objects.
callbacks: This field specifies a map of possible callbacks related to the parent operation. Each value in the map is a Callback Object.
deprecated: This field indicates if the endpoint operation is deprecated and should not be used.
Here's an example of a Path Item Object that includes all of these fields:
{
  "/pets": {
    "get": {
      "summary": "Get a list of pets",
      "description": "Returns a list of pets that are available for adoption.",
      "parameters": [
        {
          "name": "limit",
          "in": "query",
          "description": "The maximum number of pets to return.",
          "required": false,
          "schema": {
            "type": "integer"
          }
        }
      ],
      "responses": {
        "200": {
          "description": "A list of pets.",
          "content": {
            "application/json": {
              "schema": {
                "type": "array",
                "items": {
                  "$ref": "#/components/schemas/Pet"
                }
              }
            }
          }
        },
        "400": {
          "description": "Invalid input."
        },
        "401": {
          "description": "Unauthorized."
        },
        "500": {
          "description": "Server error."
        }
      }
    }
  }
}
Here is an example of a paths Object for our first api.
 Add a paths.
Swagger UI can be used to quickly test
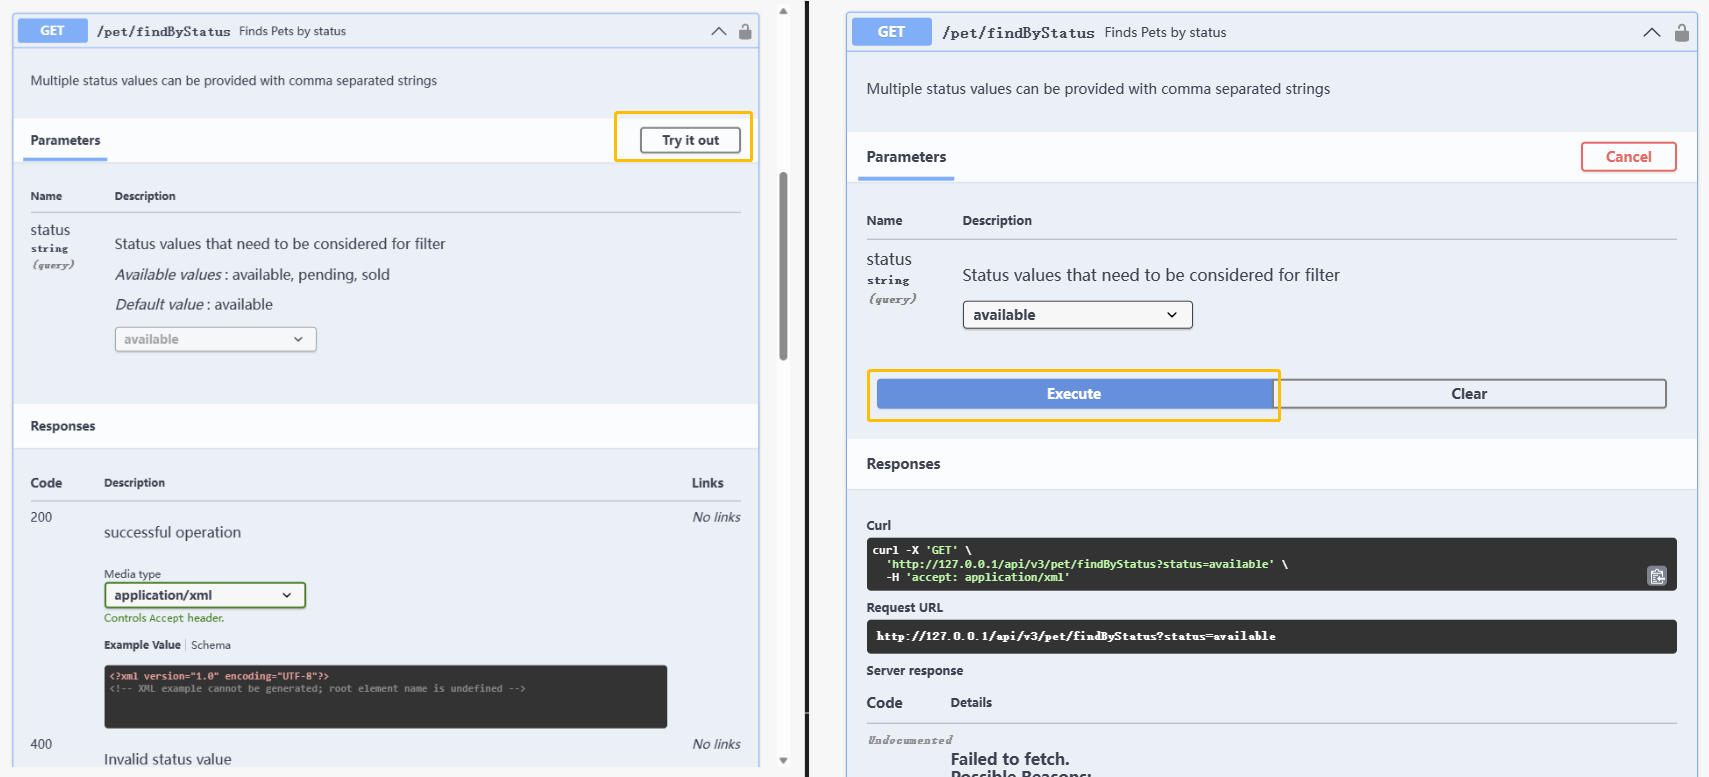
The Try it out feature in Swagger UI allows users to interact with an API by sending requests and receiving responses. It provides a user interface for testing the API without having to write code or use a separate tool.
When you click the Try it out button next to an API operation in Swagger UI, you can enter values for the operation's parameters and send a request to the API. Swagger UI will then display the response that the API returns. This allows you to quickly test and validate the behavior of an API without having to leave the Swagger UI interface.
The Try it out feature can also help you explore the capabilities of an API and understand how to use it effectively. By interacting with an API in real time, you can see how it responds to different requests and learn more about the data it returns.
Here is an example of Try it out for our first api.

Try it out
Related Posts
what are the components of an api
This article explains the different components of a REST API by following a request from end to end. An API client is responsible for assembling and directing an API request to the API server. An API request to a REST API consists of an endpoint, method, parameters, request headers, and a request body. The API server handles authentication, validates input data, retrieves or manipulates data from a database, and returns the appropriate response to the client. An API response typically includes a status code, response headers, and a body. API status codes are used to provide information to the client about the outcome of the request and to help the client understand how to proceed. Response headers and bodies provide additional information and data about the response.
View API documents in different modes
APIGit suports different viewer modes for an API documents. it is easy for you to switch viewers among of them
Secure Your Digital Doorways: Comprehensive API Security Best Practices
Protect your APIs with strong authentication, authorization, data encryption, rate limiting, input validation, and regular security testing to prevent unauthorized access and data breaches.
Ready to get started with APIGIT?
Join thousands of developers and teams who are already using APIGIT to streamline their API development workflow.